Provision a free personal Helm chart repo using GitHub
Who couldn’t use their very own personal helm chart repository these days? I know I sure could. But I know what you’re thinking, “welp, there’s another fee periodically dinging me for something I rarely use – I already haven’t used my Peacock Plus subscription since I finished watching MacGruber months ago…“, right?

Wrong. Thanks to the features GitHub provides us free of charge we can host our helm chart repo, we can store our docker images, we can cut new releases, we can have automated CI processes, and with the money we’re saving we can even afford to hang on to that otherwise worthless Peacock Plus subscription until the next season of MacGruber drops! Let’s take a look at the building blocks first, and then we’ll walk through the steps to set up a real world example:
- GitHub Repo will store our code and configuration of the other features.
- GitHub Pages will provide us with a public endpoint and an HTTP server for our chart repo.
- GitHub Actions will provide us with pipelines for our automated workflows.
- Chart Releaser is an open source tool that will make this all a breeze (and inspired this article).
- GitHub Releases will store our packaged helm chart releases (versions).
- GitHub Container Registry will store our custom docker images (versions).
Step 1: Create a GitHub Repo to house everything
My intention is for this repo to be a central home for all of my personal helm charts, not just a single chart, so I’m going to create a new public repo generically named helm-charts, taking my inspiration from the prometheus-community repo which is home to a multitude of charts in a single repo. Also, just to prepare, if you read the documentation for Chart Releaser which we’ll be using in a bit, it instructs us to create a branch in our new repo explicitly named gh-branch used by GitHub Pages, and also to keep our charts in a directory explicitly named charts (this is configurable if you desire a different name) in the main branch.
I created a new helm-charts repo in my web browser and cloned it to the machine I’m working on:
git clone https://github.com/gerkElznik/helm-charts.git && cd helm-charts
Step 2: Set up GitHub Pages for a repo endpoint
Create a new branch named gh-pages (it will contain separate content and lineage than the main branch and they’re never intended to be merged):
git checkout --orphan gh-pages
git rm -rf .
git commit -m "Initial commit" --allow-empty
git push --set-upstream origin gh-pages
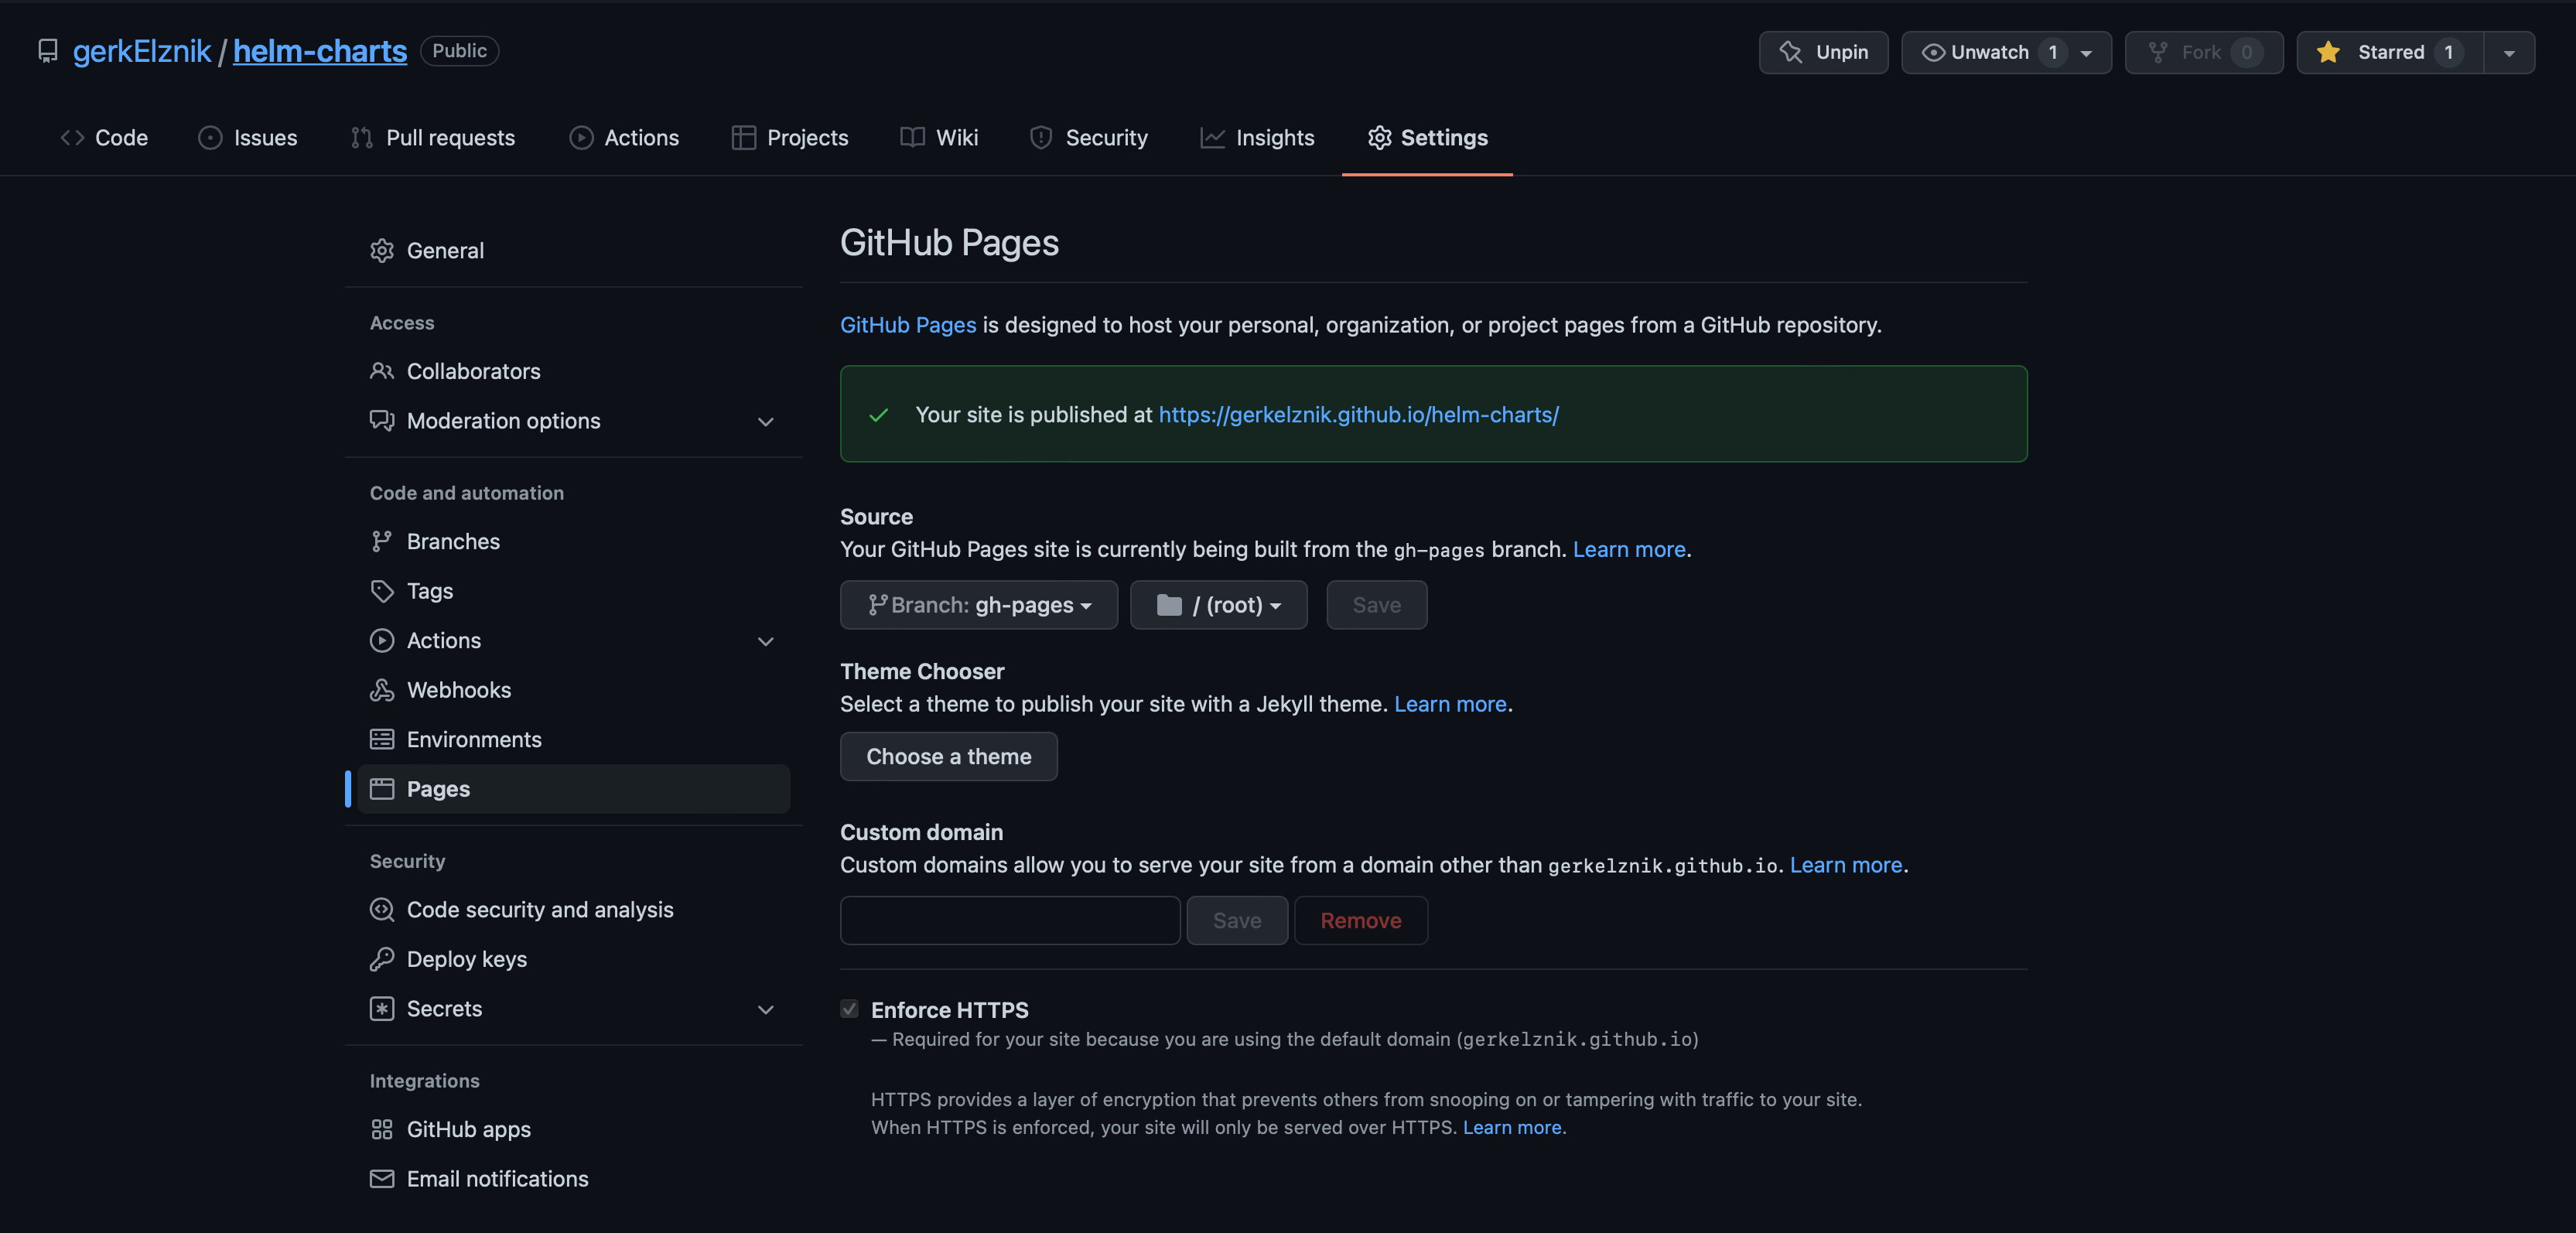
After creating the gh-pages branch you can see GitHub Pages is automatically enabled and contains a URL for your site by going to Settings >> Pages:
Step 3: Automate it all with Workflows in GitHub Actions
There will also be a new GitHub Actions Workflow named pages-build-deploy created automatically after you created the gh-pages branch:

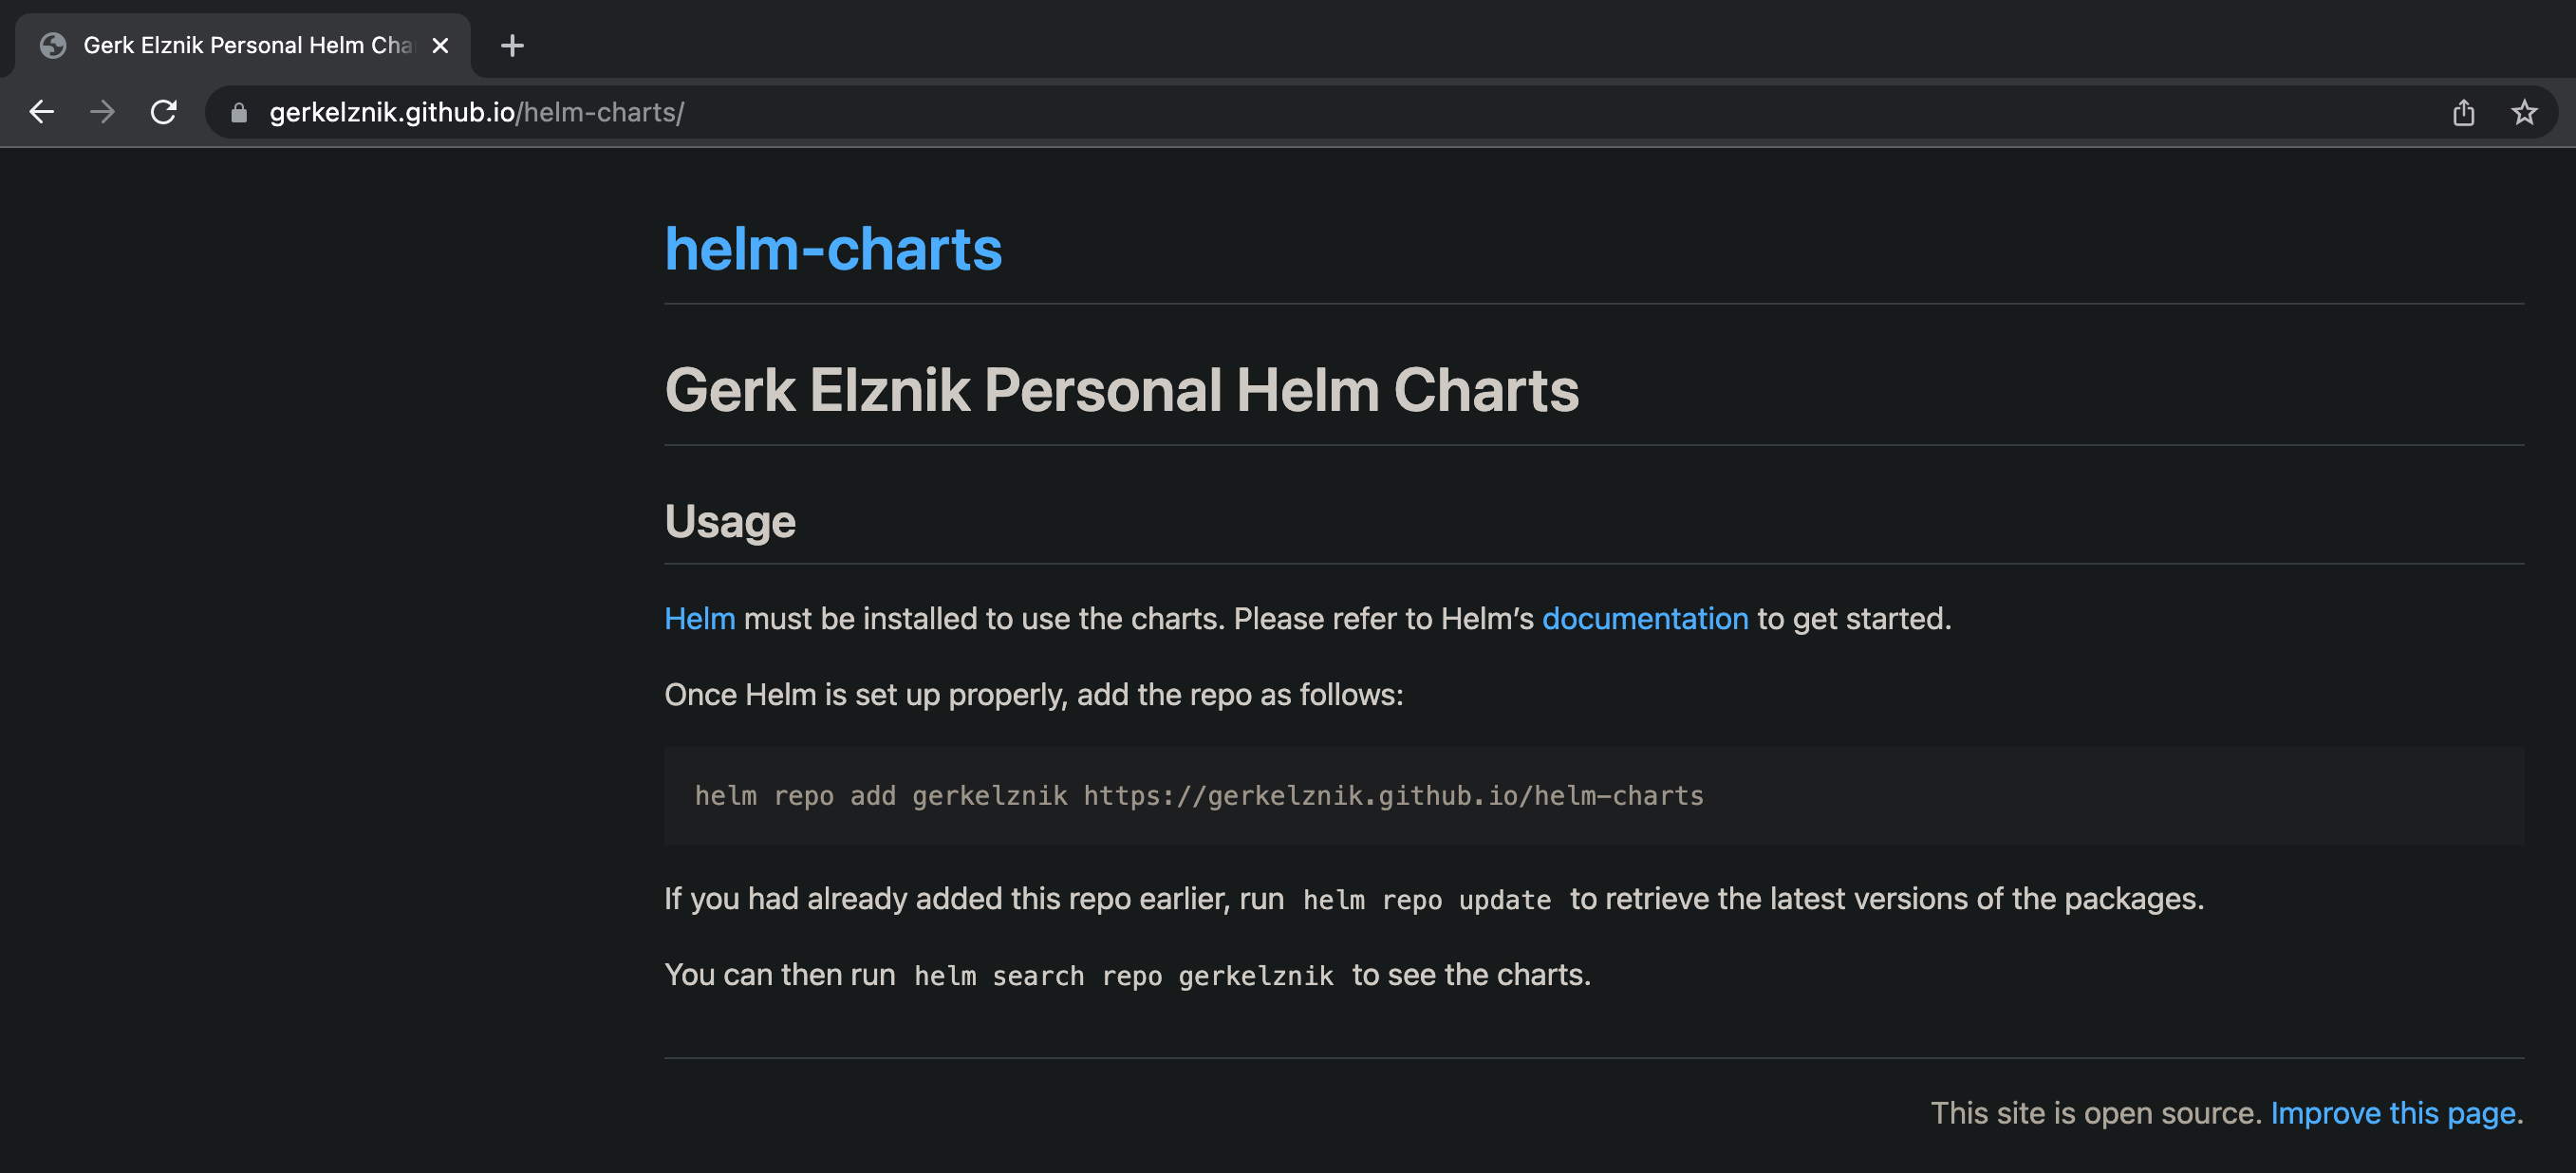
Usually, this workflow only runs after the index.yaml file for our helm repo is updated in the gh-pages branch for us by the Chart Releaser tool, but to add some instructions to our helm repo’s public endpoint (in the event a user visits it with a browser), we can add a README.md to the root of the gh-pages branch and push it (you could alternatively write an index.html if you prefer working with HTML over markdown), this should trigger your pages-build-deploy workflow and when it completes you can browse to your site and see your instructions.
Example README.md will result in this instructional page https://gerkelznik.github.io/helm-charts:
Now we’ll make use of the Chart Releaser tool’s free marketplace GitHub Action by creating a new Workflow (eg: .github/workflows/release.yml in the main branch) with the following content:
name: Release Charts

on:
  push:
    branches:
      - main

jobs:
  release:
    runs-on: ubuntu-latest
    steps:
      - name: Checkout
        uses: actions/checkout@v2
        with:
          fetch-depth: 0

      - name: Configure Git
        run: |
          git config user.name "$GITHUB_ACTOR"
          git config user.email "$GITHUB_ACTOR@users.noreply.github.com"

      - name: Install Helm
        uses: azure/setup-helm@v1
        with:
          version: v3.8.1

      - name: Run chart-releaser
        uses: helm/chart-releaser-action@v1.4.0
        env:
          CR_TOKEN: "${{ secrets.GITHUB_TOKEN }}"
This uses @helm/chart-releaser-action to turn your GitHub project into a self-hosted Helm chart repo. It does this – during every push to main – by checking each chart in your project, and whenever there’s a new chart version, creates a corresponding GitHub release named for the chart version, adds Helm chart artifacts to the release, and creates or updates an index.yaml file with metadata about those releases, which is then hosted on GitHub Pages. You do not need an index.yaml file in main at all because it is managed in the gh-pages branch.
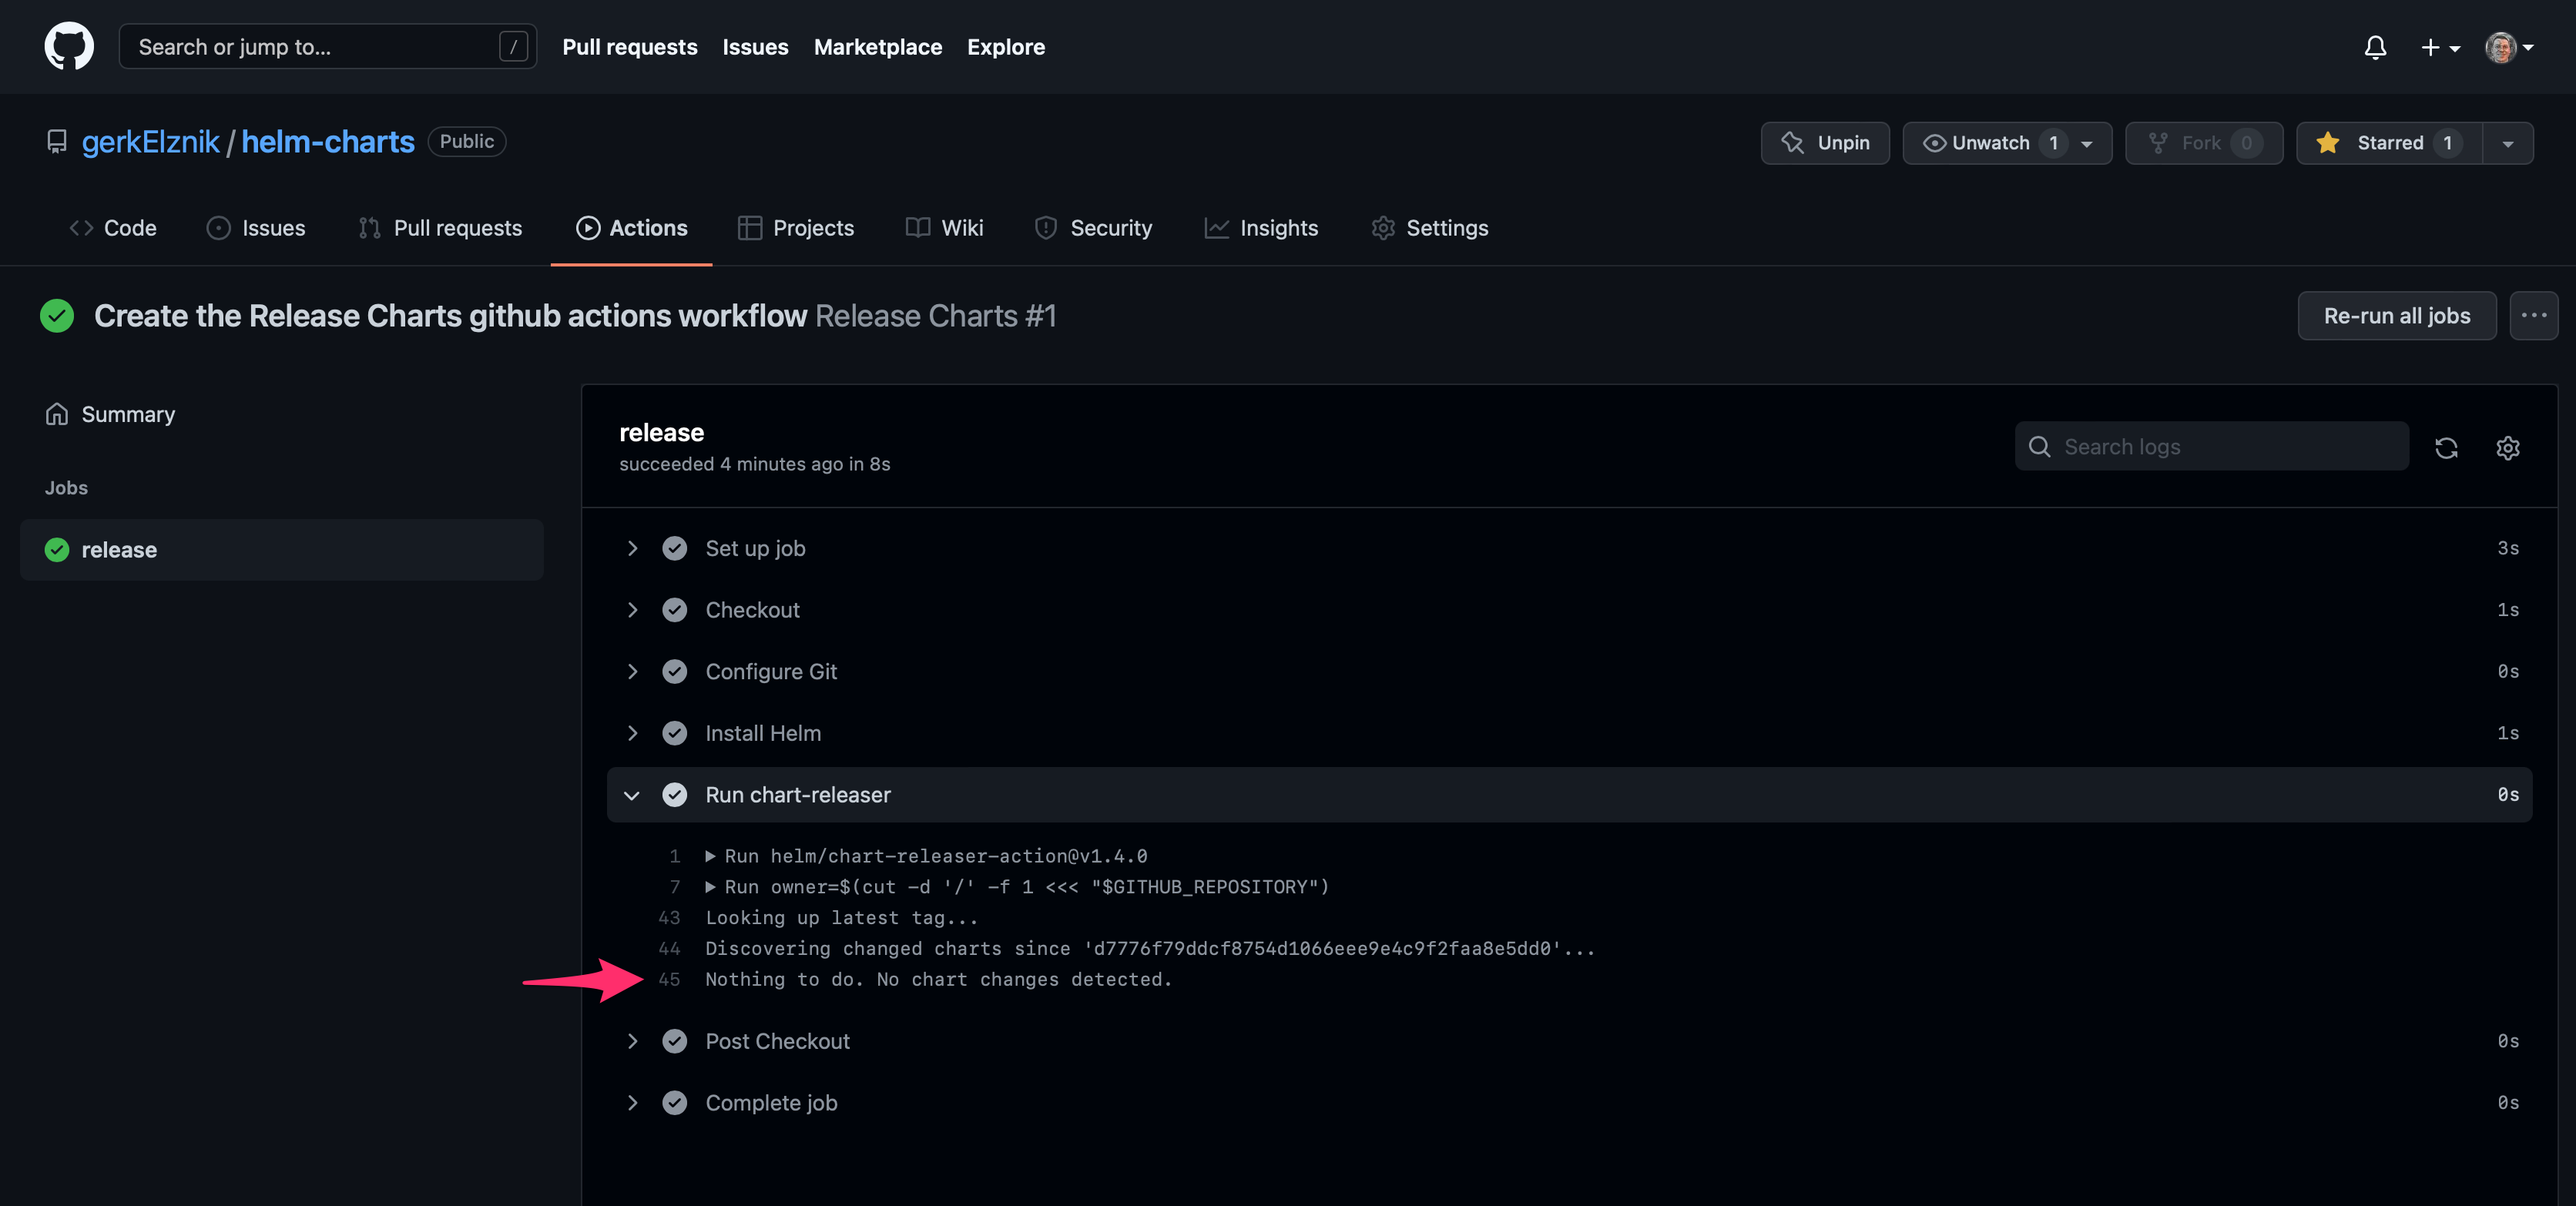
Commit and push the workflow YAML file and you should see your new workflow run, but since we don’t have any helm charts in our /charts directory yet there’s nothing for it to do – we’ll add one in just a second.
Step 4: Containerize a sample web app
Before we add a helm chart, we’ll create a very simple web app packaged as a docker image. We’ll also create another new GitHub repo to house our web app since in the real world it is common to keep our application code in a separate repo from our helm charts – the sample I created for this demo is macgruber-app.
Once you’re able to successfully build a docker image containing your app and verified it runs as expected locally, then we can add a GitHub Actions Workflow to this new repo that will handle pushing new versions of our docker image to GitHub Container Registry each time we cut a new release.
Example .github/workflows/publish-image.yml
name: Create and publish a Docker image

on:
  release:
    types: [published]

env:
  REGISTRY: ghcr.io
  IMAGE_NAME: ${{ github.repository }}

jobs:
  build-and-push-image:
    runs-on: ubuntu-latest
    permissions:
      contents: read
      packages: write

    steps:
      - name: Checkout repository
        uses: actions/checkout@v3

      - name: Log in to the Container registry
        uses: docker/login-action@v1
        with:
          registry: ${{ env.REGISTRY }}
          username: ${{ github.actor }}
          password: ${{ secrets.GITHUB_TOKEN }}

      - name: Extract metadata (tags, labels) for Docker
        id: meta
        uses: docker/metadata-action@v3
        with:
          images: ${{ env.REGISTRY }}/${{ env.IMAGE_NAME }}
          tags: |
            type=semver,pattern={{version}}

      - name: Build and push Docker image
        uses: docker/build-push-action@v2
        with:
          context: .
          push: true
          tags: ${{ steps.meta.outputs.tags }}
          labels: ${{ steps.meta.outputs.labels }}
The above workflow is triggered by a release being published in your repo. It checks out the GitHub repository, and uses the
login-actionto log in to the Container registry. It then extracts labels and tags for the Docker image. Finally, it uses thebuild-push-actionaction to build the image and publish it on the Container registry.
Now we will cut a release for our sample app, I’ll use the GitHub CLI as it leaves a nice paper trail to follow, but feel free to do the same from your web browser.
If you don’t already have it and you’re on macOS, install GitHub CLI using Homebrew and peak at their getting-started instructions:
brew install gh
Now execute these GitHub CLI commands from the root directory of your sample app repo (for me this is macgruber-app):
# interactive setup
gh auth login

gh release create v0.1.0 --notes "Initial release of macgruber-app"
As soon as your new release is published you should be able to see your workflow created above automatically triggering a run:

When the workflow completes you should see the image added to your Packages:
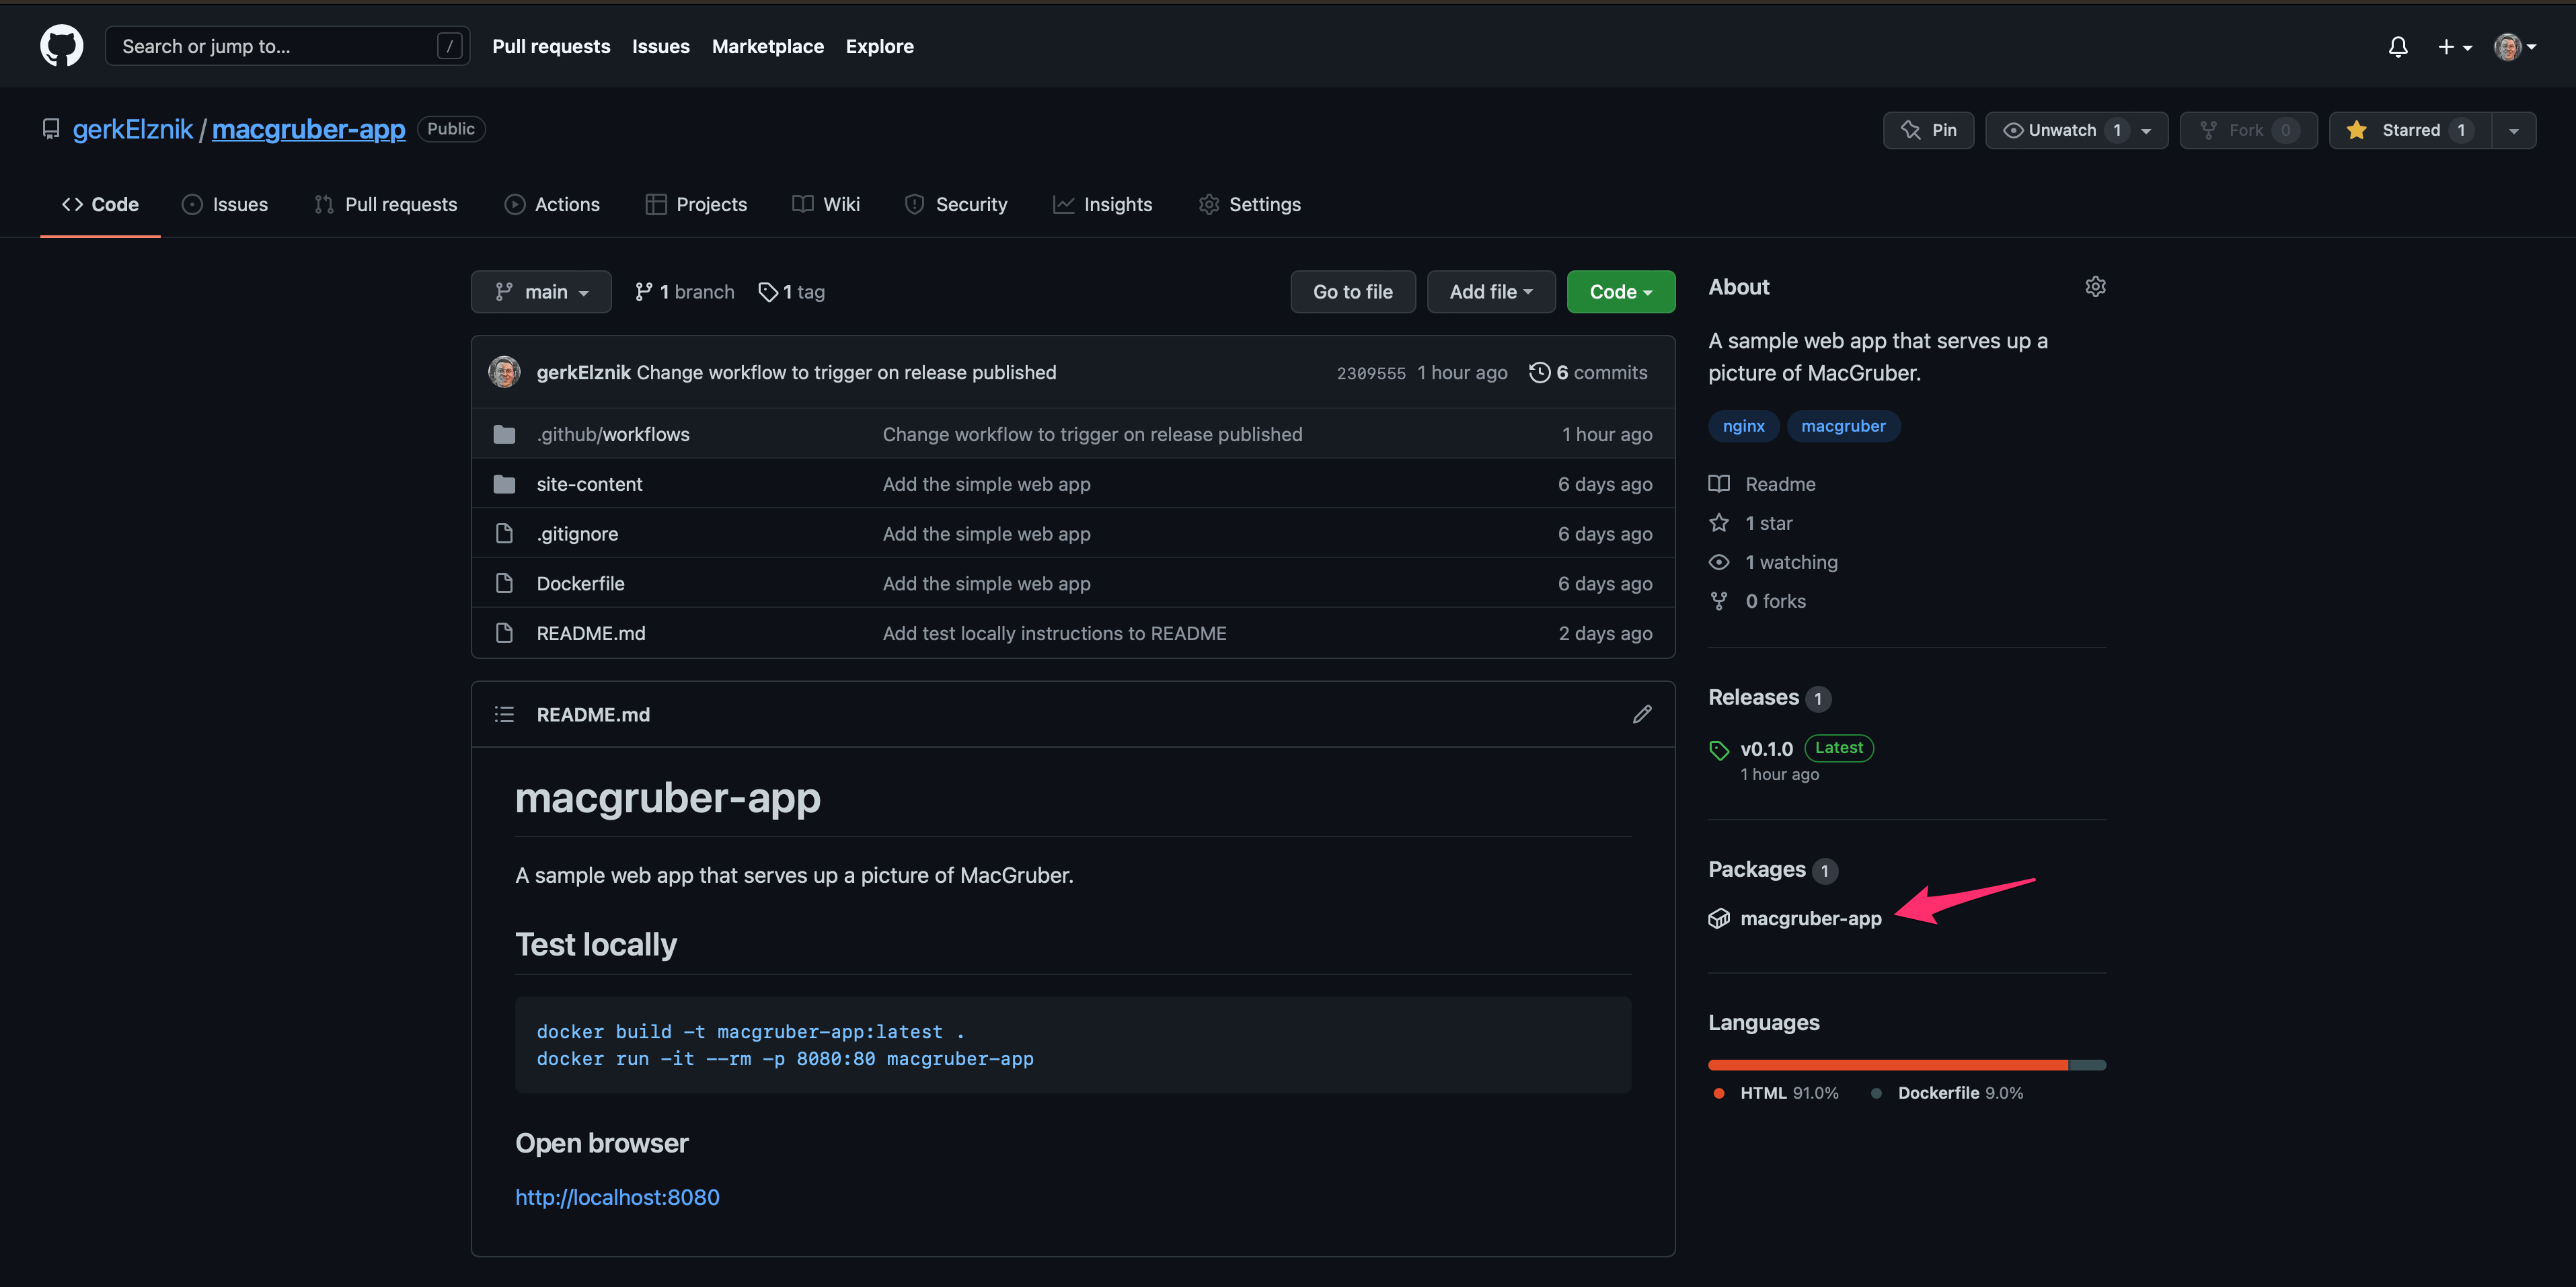
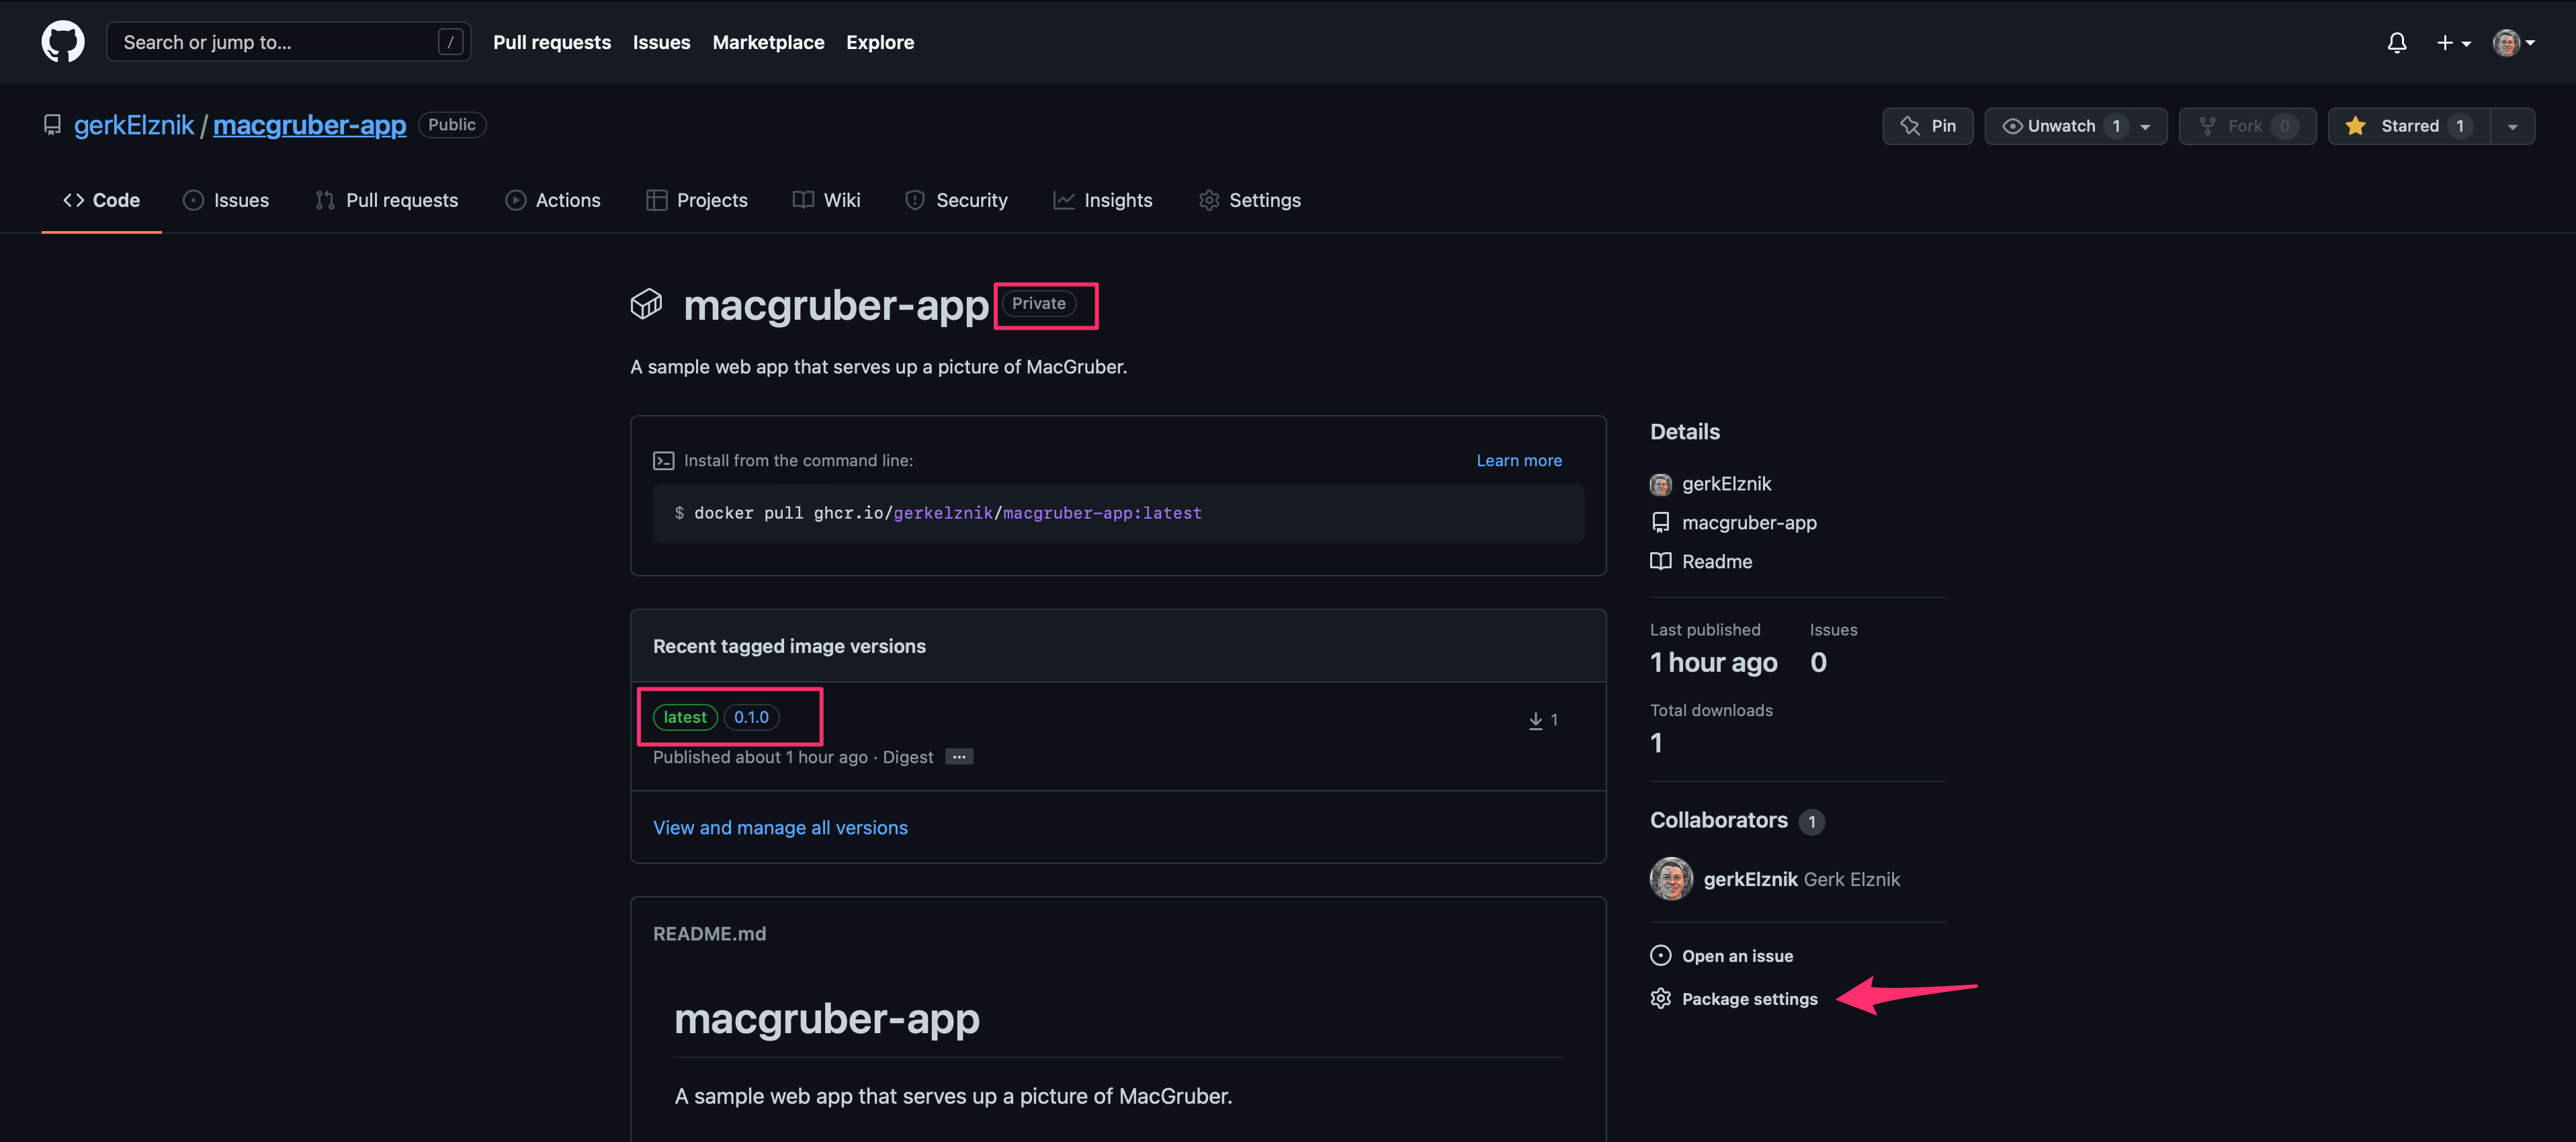
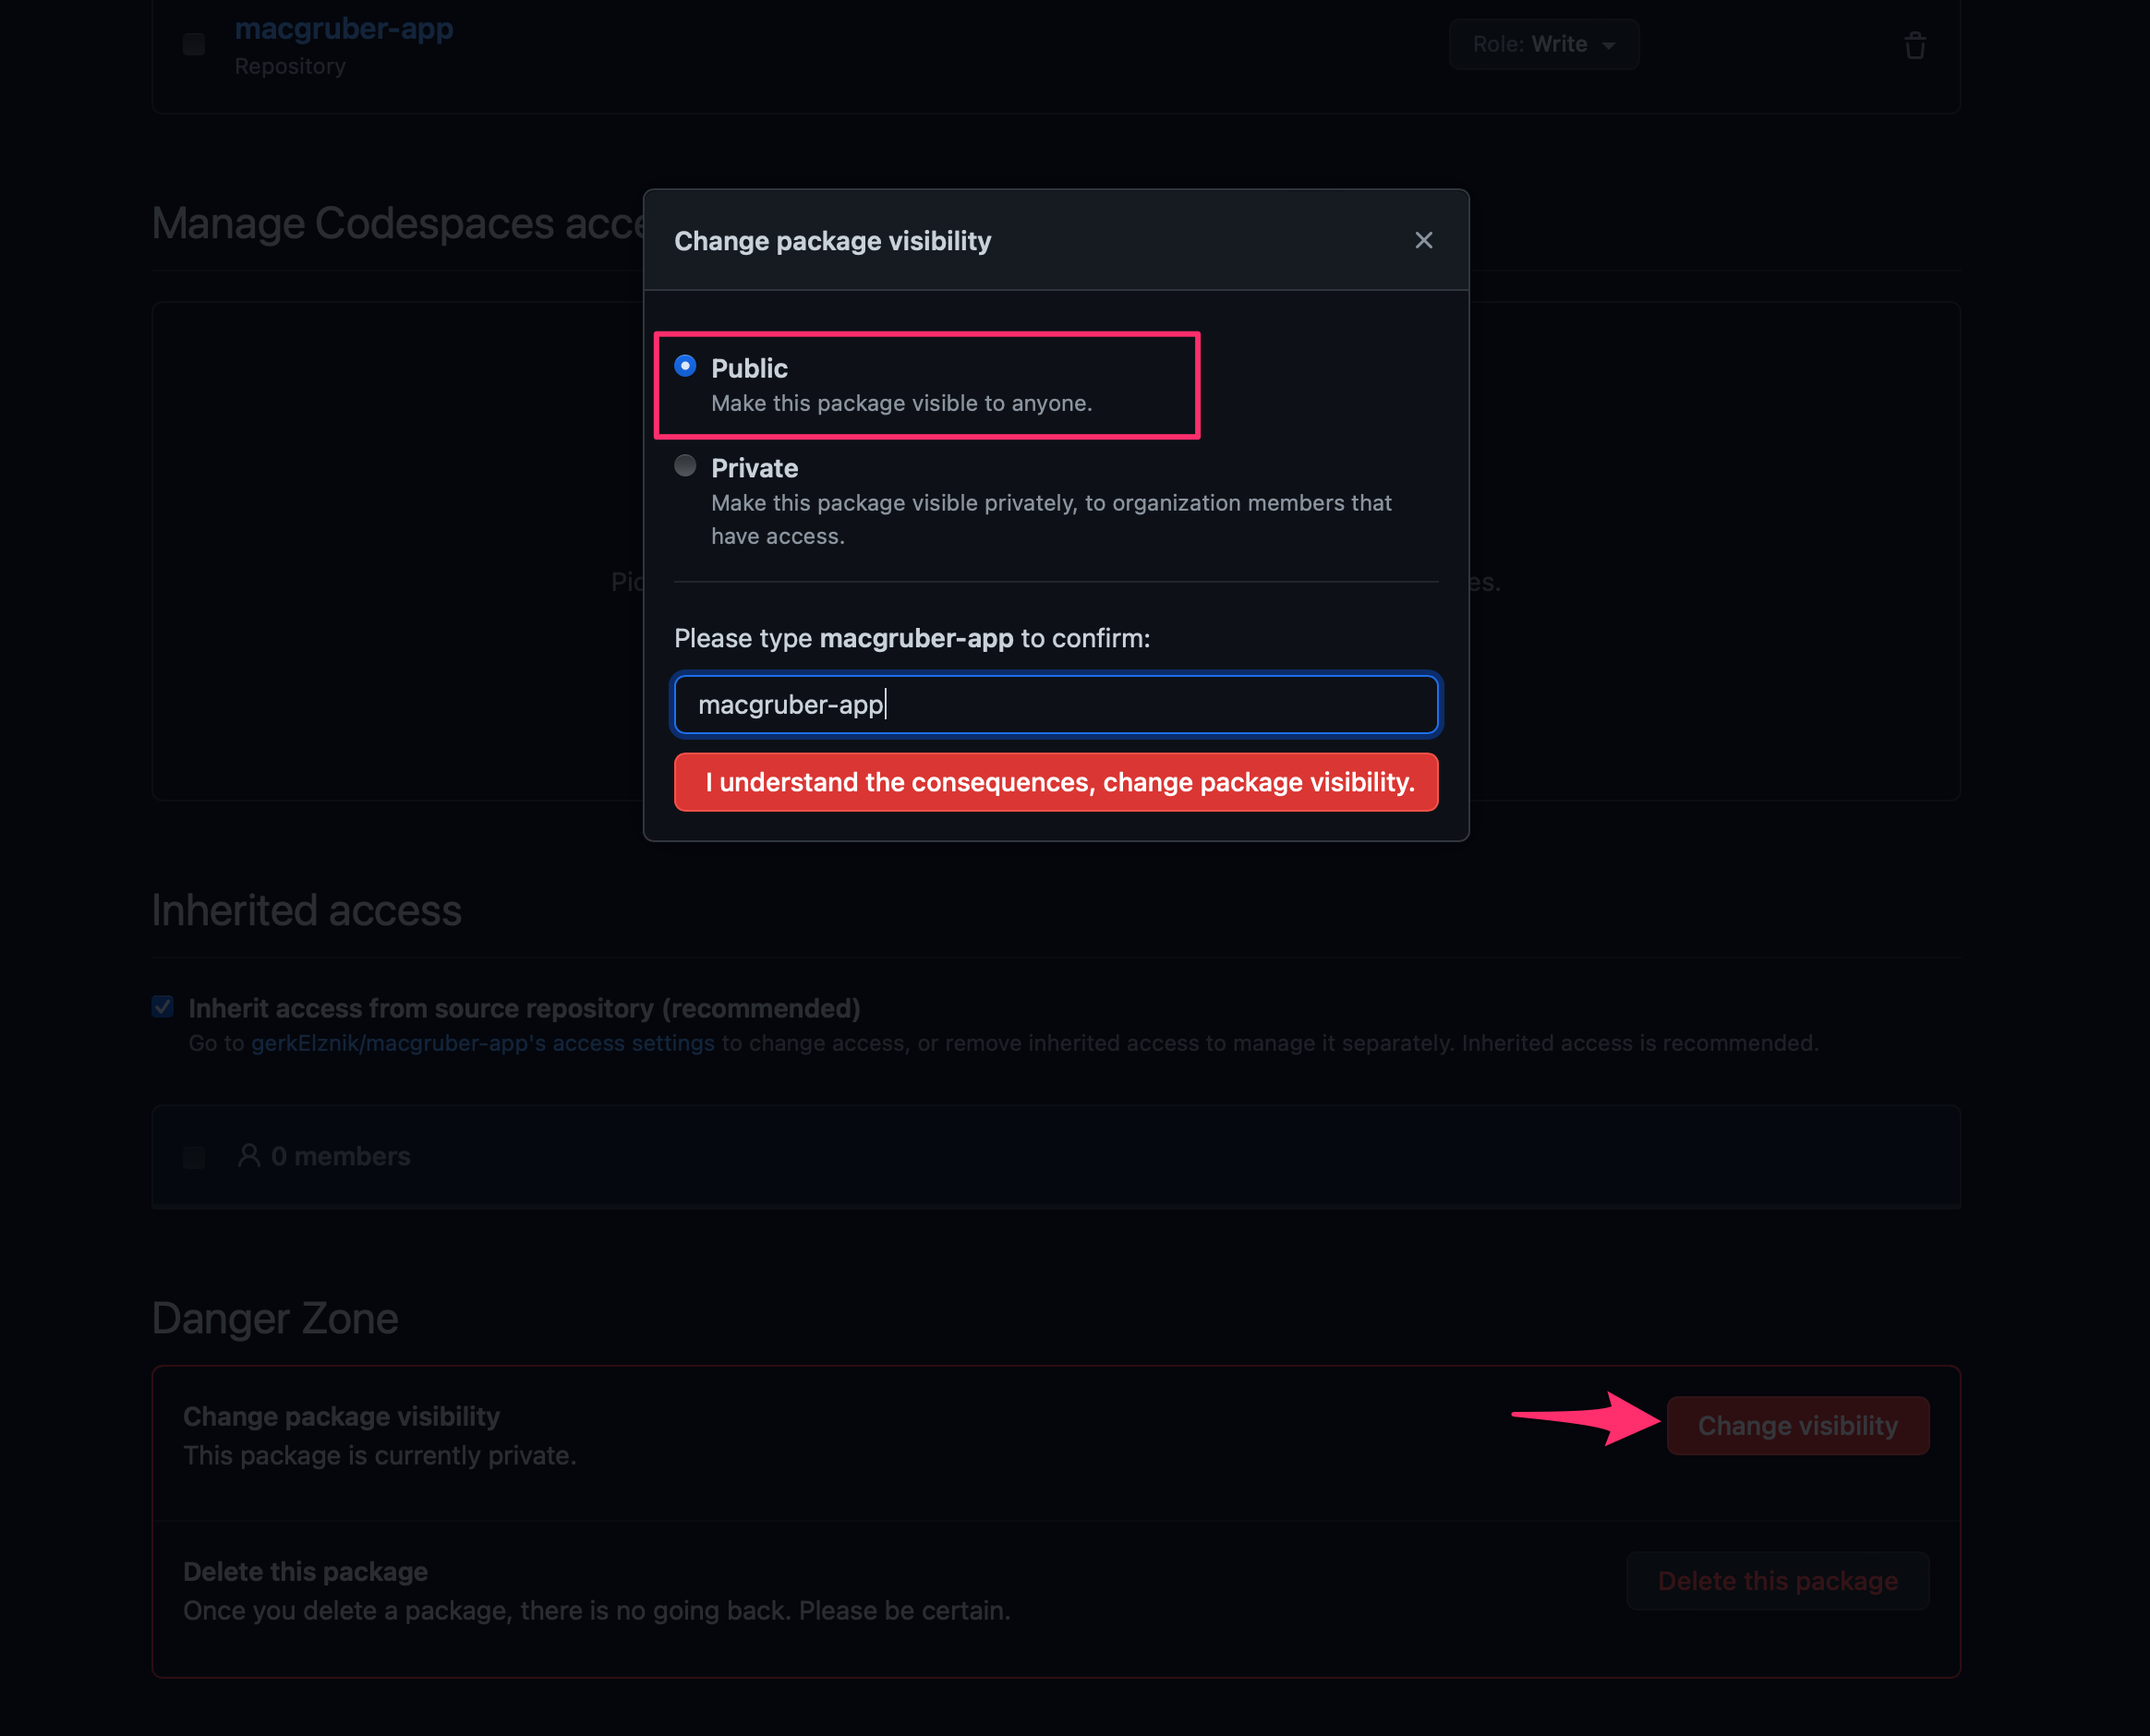
When you click on the new package (see the red arrow above), you’ll be able to see a version tag created (in this case 0.1.0) for the image that corresponds to the release we cut. Unfortunately, I found that the package (image) was published as “Private” meaning an anonymous user would be unable to pull this image, and that’s not what I want for the applications my personal helm charts will package up since I desire to be able to share them freely, and at the time of this writing I was unable to find a way to automate changing it to “Public” – however, the package’s visibility can be manually changed by clicking on “Package settings” as the red arrow below shows:
Then in the “Danger Zone” change the visibility to Public:
GitHub Packages using Container Registry (ghcr.io) is still pretty new so I will keep an eye on the API and be on the lookout for a way to automate Public visibility and will update the article when this capability is available.
Now your image should be public to the world and any anonymous user can pull it like so:
docker pull ghcr.io/gerkelznik/macgruber-app:0.1.0
Step 5: Publish a helm chart
Be sure you have helm installed, I’m using the following version:
$ helm version
version.BuildInfo{Version:"v3.8.1", GitCommit:"5cb9af4b1b271d11d7a97a71df3ac337dd94ad37", GitTreeState:"clean", GoVersion:"go1.17.8"}
Switch back to the helm-charts repo we created earlier and make sure you’re on the main branch (or at least not the gh-pages branch), then create our new helm chart within a directory named charts (remember from earlier, the @helm/chart-releaser-action action looks for new chart versions in this directory, otherwise it will find nothing to do):
$ mkdir -p charts && cd charts
$ helm create macgruber
$ tree
.
└── macgruber
    ├── Chart.yaml
    ├── charts
    ├── templates
    │   ├── NOTES.txt
    │   ├── _helpers.tpl
    │   ├── deployment.yaml
    │   ├── hpa.yaml
    │   ├── ingress.yaml
    │   ├── service.yaml
    │   ├── serviceaccount.yaml
    │   └── tests
    │       └── test-connection.yaml
    └── values.yaml

4 directories, 10 files
To keep this example simple, we’ll delete everything in the macgruber directory that was generated for us except:
Chart.yamlvalues.yamltemplates/_helpers.tpltemplates/deployment.yamltemplates/service.yamltemplates/serviceaccount.yaml
Most of the defaults are okay for us to keep, we just need to make the following replacements:
Charts.yaml - Change the appVersion value to the version of the release we cut for our simple app (should match the tag of the docker image, so don’t include the “v” prefix):
appVersion: "0.1.0"
values.yaml - Change the image.repository value to the registry/repo we pushed our docker image to earlier:
image:
  repository: ghcr.io/gerkelznik/macgruber-app
Now just push your changes to the main branch and the Release Charts followed by the pages-build-deployment workflows will execute:

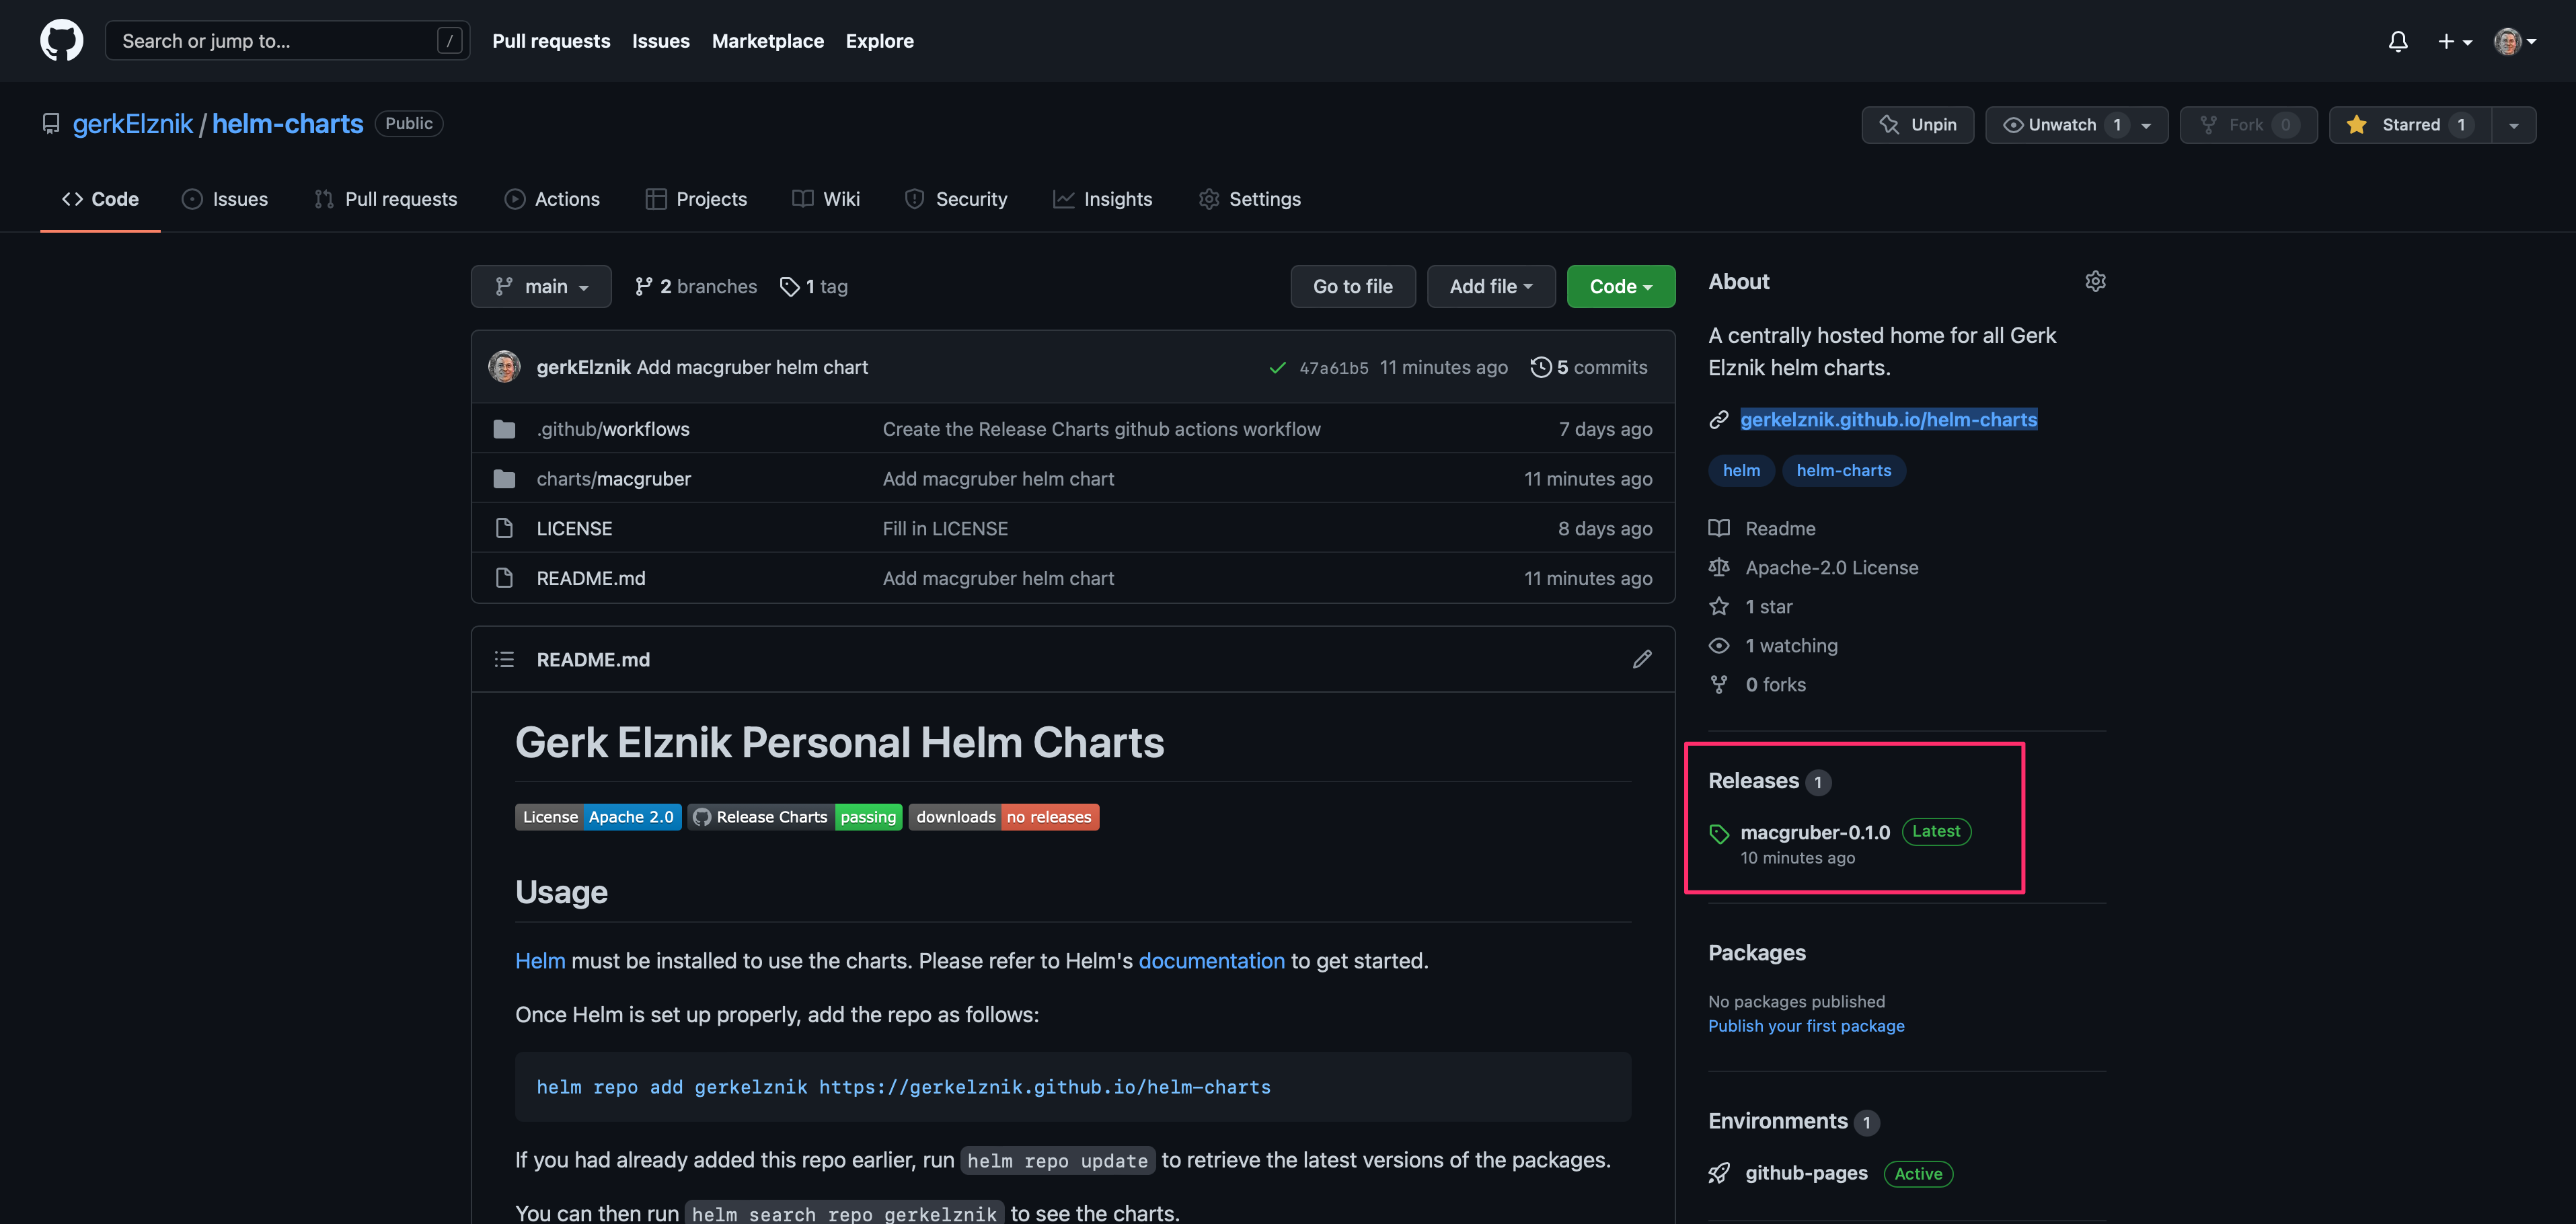
Once these are complete you should be able to see the new helm chart release:
And to verify the site is hosting the backbone of your helm chart repo, the index.yaml, just add it to the end of your GitHub Pages URL and visit it in a browser, for example, https://gerkelznik.github.io/helm-charts/index.yaml
Step 6: Verify the end-user experience
We’re finally ready to see if our hard work paid off and we can share our bundled-up application as a helm chart.
- The first thing an end-user needs to do is add our repo using the GitHub Pages URL:
$ helm repo add gerkelznik https://gerkelznik.github.io/helm-charts "gerkelznik" has been added to your repositories - Then they can search for charts in the repo:
$ helm search repo gerkelznik NAME CHART VERSION APP VERSION DESCRIPTION gerkelznik/macgruber 0.1.0 0.1.0 A Helm chart for a MacGruber punch! - They need a Kubernetes cluster to release the chart to, so we’ll create a test environment by starting a local minikube cluster:
$ minikube version minikube version: v1.25.2 commit: 362d5fdc0a3dbee389b3d3f1034e8023e72bd3a7 $ minikube config set driver docker ❗ These changes will take effect upon a minikube delete and then a minikube start $ minikube start 😄 minikube v1.25.2 on Darwin 12.3.1 ✨ Using the docker driver based on user configuration 👍 Starting control plane node minikube in cluster minikube 🚜 Pulling base image ... 💾 Downloading Kubernetes v1.23.3 preload ... > preloaded-images-k8s-v17-v1...: 505.68 MiB / 505.68 MiB 100.00% 37.66 Mi > gcr.io/k8s-minikube/kicbase: 379.06 MiB / 379.06 MiB 100.00% 24.76 MiB p 🔥 Creating docker container (CPUs=2, Memory=8100MB) ... 🐳 Preparing Kubernetes v1.23.3 on Docker 20.10.12 ... ▪ kubelet.housekeeping-interval=5m ▪ Generating certificates and keys ... ▪ Booting up control plane ... ▪ Configuring RBAC rules ... 🔎 Verifying Kubernetes components... ▪ Using image gcr.io/k8s-minikube/storage-provisioner:v5 🌟 Enabled addons: storage-provisioner, default-storageclass 🏄 Done! kubectl is now configured to use "minikube" cluster and "default" namespace by default - And finally they can install the helm chart:
$ helm install macgruber gerkelznik/macgruber
NAME: macgruber
LAST DEPLOYED: Wed Apr  6 21:54:16 2022
NAMESPACE: default
STATUS: deployed
REVISION: 1
TEST SUITE: None
Voila, we now verified that an end-user can install our new helm chart and we have a pod running a container using the simple app image we built earlier:

Just for fun, we can port forward local port 8080 to the Service our helm chart created (which listens on port 80):
kubectl port-forward service/macgruber 8080:80
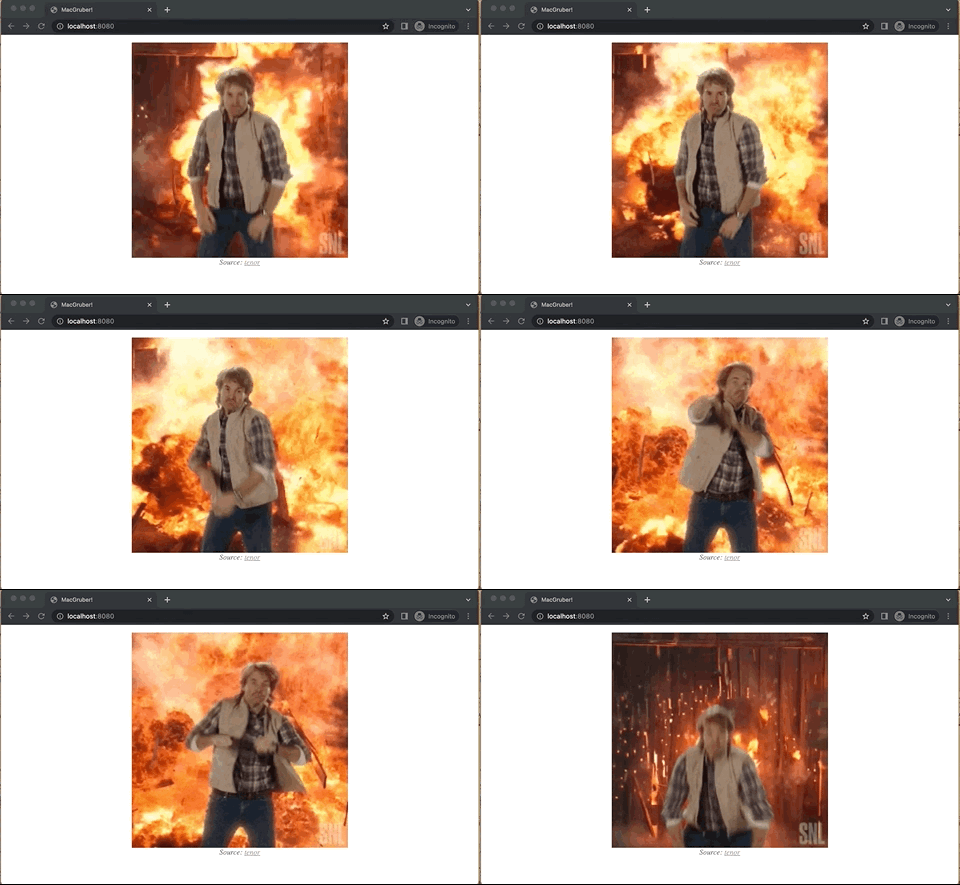
And then see our awesome new app in action from a browser at http://localhost:8080:
In Conclusion
The GitHub ecosystem provides a nice free option for hosting helm chart repos, in addition, it also provides automated workflows managed with pipeline-as-code, docker image repos, and of course application code repos.
In this article, we saw there are several steps necessary to get to the point where you have a shareable public helm chart. I found that GitHub has free features checking all the boxes to get you there. I’m interested to hear your feedback on experiences you’ve had with various other tools that accomplish the same.
For my next post, I’ll continue where we left off in this article and I’ll show how we can add another GitHub Actions Workflow to our helm-chart repo to lint and test pull requests for our charts using an action called @helm/chart-testing-action. This will spin up an ephemeral kind Kubernetes cluster and use a Chart Testing tool to automate testing our helm charts. Stay tuned by following me.
If you enjoyed this post I’d appreciate some claps for it over on Medium!